Layout Customization
Enhance your efficiency with our pre-defined design layouts and an intuitive editor tailored to facilitate the creation of consistent, appealing, and informative Change Logs. Utilize our ready-made lazouts or craft your own to infuse a personal touch into your Change Logs and tailor them perfectly to your specific needs. With a total of 6 components, we offer you extensive possibilities to customize your Changelog.
Formats
You have the capability to customize the layout for (PDF & HTML) and Markdown.

In the (PDF & HTML) format, you can toggle between content and style. In the Content section, you can input HTML code using Handlebars. In the Style section, you can define the style using CSS.
In the Markdown format, you can define your Markdown code using Handlebars.
All your changes will be compiled and displayed in the preview on the right side of the editor.
Information
The layout editor uses test data to populate the handelbars. Once you create a Changelog, actual data will be used.
Define Test Data
Using the Define Test Data function, you can now define the data yourself in the Layout Editor.
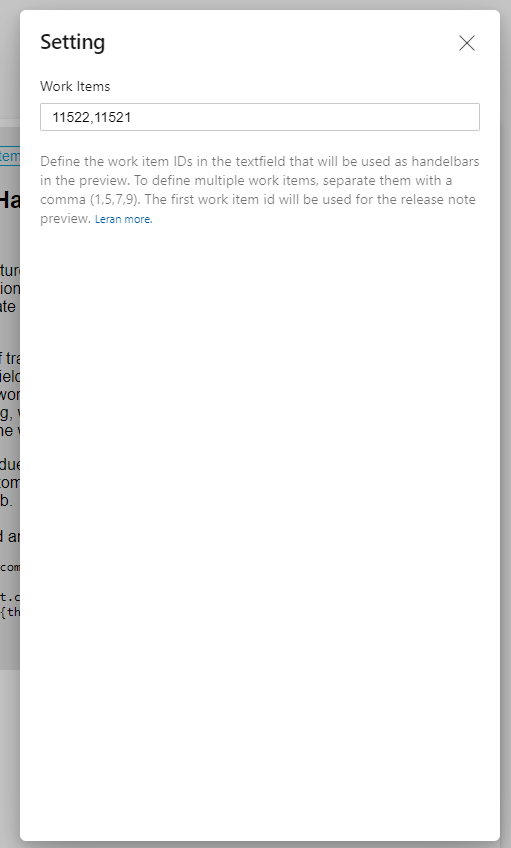
Specify the work item IDs there. To define more than one, separate them with a comma. Then you can close the panel and the values will be loaded in the preview if the data is valid.
Using Handelbars
The Handlebars system offers them many different options to personalize their layout.
For each component, you will find several handelbars at your disposal. To add a handelbar just click on the button in the editor.
Examples
In the following examples, different layout examples will be shown to you, which should help you to define their own layouts.
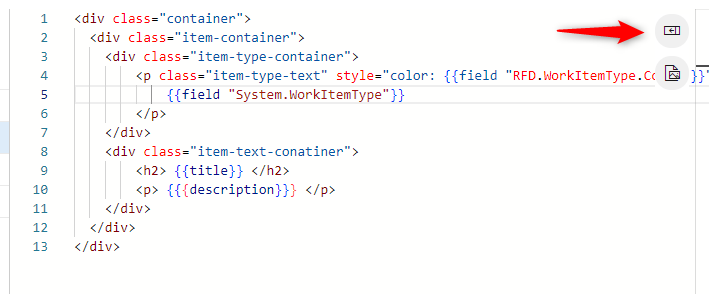
Work Item Handelbars
Here, all work item fields are specified as editable. To include these fields in your layout, you can use the following syntax:
In the end, an integration into the release note layout might look like this
<div class="container">
  <div class="item-container">
    <div class="item-type-container">
        <p class="item-type-text" style="color: {{field "RFD.WorkItemType.Color"}}">
          {{field "RFD.WorkItemId"}} - {{field "System.WorkItemType"}}
        </p>
    </div>
    <div class="item-text-conatiner">
        <h2> {{title}} </h2>
        <p> {{{description}}} </p>
    </div>
  </div>
</div>
File Tracking Handelbars
The File Tracking handelbars allow you to list the changes made since the last commit of each work item. Please note that the "Search for file changes" option must be enabled in the import settings.
Use Case |
Description |
|---|---|
{{commit "changecount"}} |
The Count of the changes |
{{#each commit.changes}}{{/each}} |
A list of the changes |
{{this.path}} |
The path of the current change |
{{this.type}} |
The change type of the current change |
Here is an example of how you can integrate this:
<div> Changes ({{commit "changecount"}}):</div>
<ul>
    {{#each commit.changes}}
        <li><b>{{this.type}}</b> -> {{this.path}}</li>
    {{/each}}
</ul>
Placeholders
To integrate your previously created placeholders, you need to implement the following handlebars in your code.
Replace "My Placeholder" with your created placeholder key. You can place this handlebars as many times as needed within your layout.
Queries
In the layout, you can also query variable values. You have the following options:
eq: Checks ifvalue1is equal tovalue2(value1 == value2).noteq: Checks ifvalue1is not equal tovalue2(value1 != value2).
To perform an "if" statement, please use the following syntax:
This query is then placed inside an "if" block. Remember to replace the values of value1 and value2 with your desired values.
For example, if you want to perform a different action in the release note and work item type, you can use the following code:
{{#if (eq (field "System.WorkItemType") "New Feature")}}
!!! abstract "Feature Upgrade"
    {{title}}

    {{{description}}}
{{else if (eq (field "System.WorkItemType") "Bug Fix")}}
!!! bug "Bug Fix"
    {{title}}

    {{{description}}}
{{/if}}
Important
If you want to use handlebars, make sure that you replace the brackets with a clamp.
From {{field "System.WorkItemType"}} to (field "System.WorkItemType")
Inline
To ensure a consistent inline format, you can use the following example as a guide:
{{#if (eq (field "System.WorkItemType") "New Feature")}}
!!! abstract "Feature Upgrade"
    {{> title }}

    {{> description}}
{{else if (eq (field "System.WorkItemType") "Bug Fix")}}
!!! bug "Bug Fix"
    {{> title }}

    {{> description}}
{{/if}}

{{#*inline "description"}}
{{{description}}}
{{/inline}}
{{#*inline "title"}}
**{{title}}**
{{/inline}}