OpenAI Integration
With our OpenAI integration, we have taken a step into the future and created a direct KI integration that merges with the "Release Notes for DevOps Extension" and provides new and efficient ways. By means of customizable commands, you have the possibility to process data from the "Release Notes for DevOps Extension" via KI. This OpenAI integration helps you to improve the quality and professionalism of your release notes. Let the KI generate your release notes directly, improve your written release notes or translate your written release notes and more. This innovative integration offers you time savings and quality assurance.
Setup
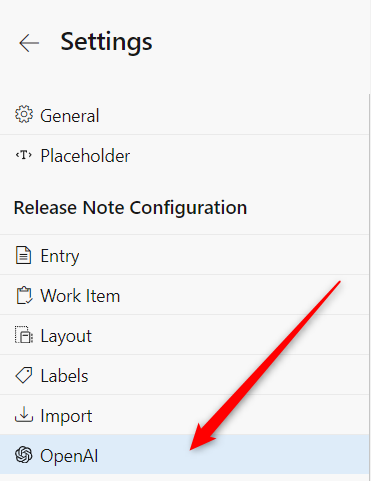
To use the OpenAI integration, you must first configure the OpenAI integration. To configure this, please navigate to the settings in the "Release Notes for DevOps Hub". There you will find the "OpenAI" tab on the bottom left.
Enable OpenAI
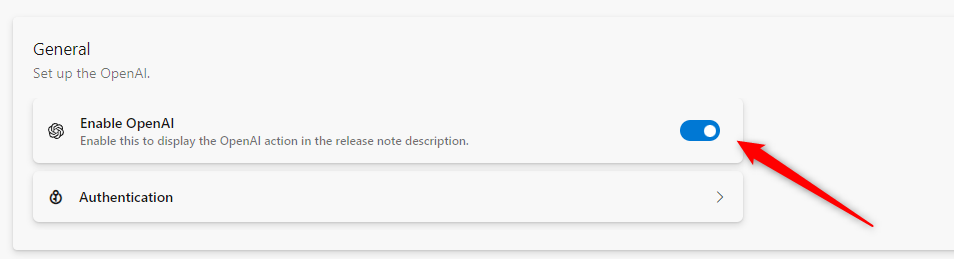
In the General tab, you can control whether the OpenAI integration is active or not with the Enable OpenAI action. Once you enable this action, all users will see an action with a chatbot icon in the HTML editor when writing release notes. Users can use this action to access the OpenAI integration.
Authentication
For the OpenAI integration to work, you need to set up your OpenAI API key. To do this, click on the "Authentication" action and enter your API key in the "API Key" field. This is done in the background and does not require any manual action. You can find your secret API key in the OpenAI Authentication.
Configuration
In the "Configuration" card, you will find all the essential settings to configure the OpenAI integration according to your preferences. On the left side, you will find several configuration options divided into two categories: System and Commands.
Parameter
OpenAI can be fine-tuned with a number of parameters. You can find them on the right side in the "Configuration" tab. You can adjust the parameters for each command individually according to your preferences, as well as for the "Chat" system.
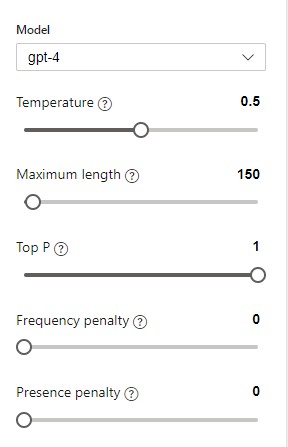
The following parameters are available in the Release Notes for DevOps extension:
| Parameter | Description |
|---|---|
| Model | ID of the model to use. See the OpenAI Model documentation for more information. |
| Temperature | What sampling temperature to use, between 0 and 2. Higher values like 0.8 will make the output more random, while lower values like 0.2 will make it more focused and deterministic. We generally recommend altering this or Top P but not both. |
| Maximum length | The maximum number of tokens to generate in the chat completion. |
| Top P | An alternative to sampling with temperature, called nucleus sampling, where the model considers the results of the tokens with Top P probability mass. So 0.1 means only the tokens comprising the top 10% probability mass are considered. We generally recommend altering this or temperature but not both. |
| Frequency penalty | Number between -2.0 and 2.0. Positive values penalize new tokens based on their existing frequency in the text so far, decreasing the model's likelihood to repeat the same line verbatim. |
| Presence penalty | Number between -2.0 and 2.0. Positive values penalize new tokens based on whether they appear in the text so far, increasing the model's likelihood to talk about new topics. |
System
Under the System category, you'll find the Chat tab. OpenAI's Generative Pre-trained Transformer (GPT) models have been trained to understand natural language and code. GPTs provide text output in response to their inputs. The inputs to GPTs are also called "prompts". Designing a prompt is essentially how you "program" a GPT model, usually by providing instructions or examples for successful task execution. You can define this in the middle system text box. For default behavior, leave this field blank. For more information, see the GPT Best Practices Guide.
Commands
The commands are a powerful tool in the OpenAI integration to combine direct commands super quickly and efficiently with AI requests using data from Azure DevOps and the "Release Notes for DevOps Extension" to achieve great results. To start, we offer you a total of 4 commands, giving you a good selection of useful commands that you can completely configure on top.
| Command | Description |
|---|---|
| Create Release Note | With this command, data is captured from the respective release note work item data to generate a suitable release note description. |
| Improve Release Note | With this command, the existing release note description is taken and improved. |
| Translate Release Note | With this command, the existing release note description is taken and translated to the defined language. |
| Validate Release Note | With this command, the AI can check for you if the written release note description meets the defined criteria in the command text field. |
In the command text box in the middle, you can replace the default values with your own preferences. We provide a handlebar functionality that allows you to use values from Azure DevOps or from the Release Notes for DevOps extension. To use these, the handlebars are defined as fields in the Release Notes for DevOps extension that you can easily implement in the text editor. After selecting the desired command, you will find a button in the upper right corner of the text field.
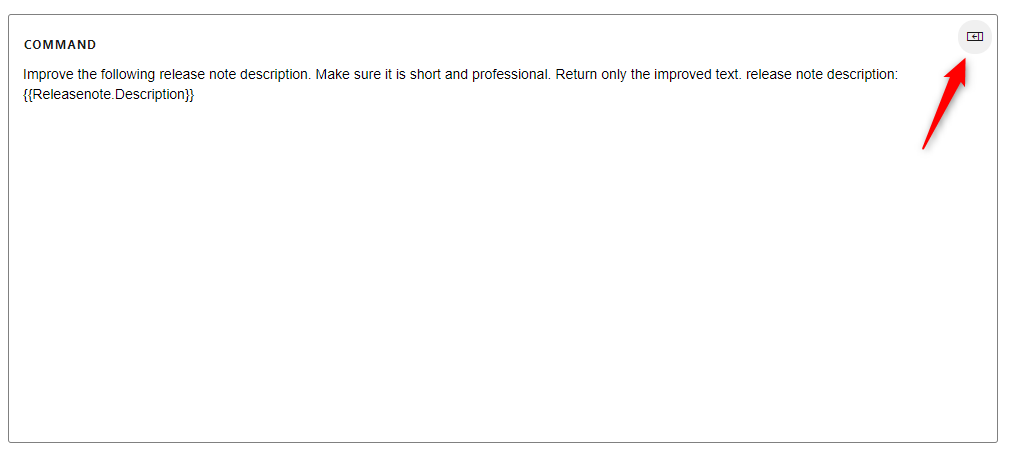
Go to the location in the text box and highlight specific text, then click the button. This opens a panel with the available fields that you can include.
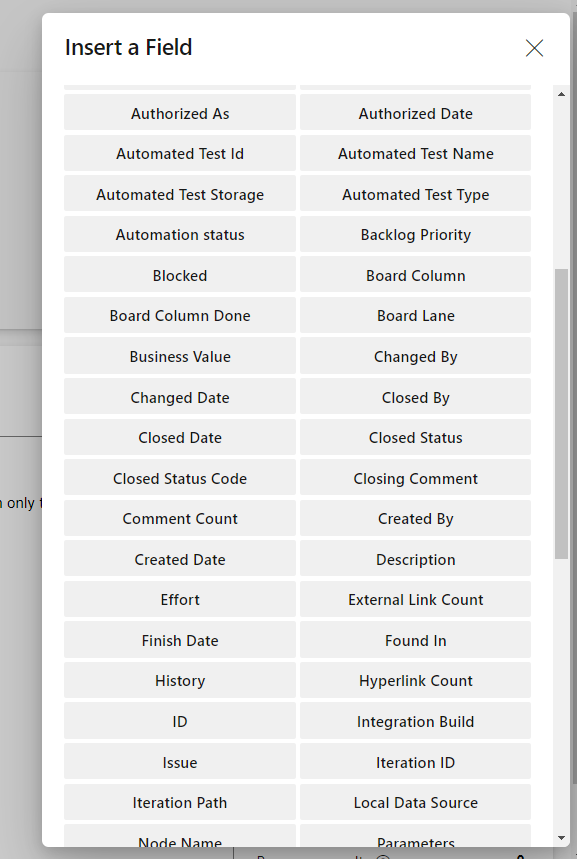
Select and click the field you want to add to the text field.
At the end, the field is added with double curly braces, which might look like this
You can also include if conditions to integrate, for example, different fields for different work item types. This could look like this:
{{#if (eq System.WorkItemType "Product Backlog Item")}}
{{System.Description}}
{{else if (eq System.WorkItemType "Bug")}}
{{Microsoft.VSTS.Common.AcceptanceCriteria}}
{{/if}}
In this example, the work item type is queried. If it is a "Product Backlog Item", the {{System.Description}} field is used, and if it is a "Bug", the {{Microsoft.VSTS.Common.AcceptanceCriteria}} field is used. It's important to note that you use fields without parentheses in the if condition, as shown in the example.
How to Use
Important
To use OpenAI, please make sure you have completed the setup process and OpenAI is enabled.
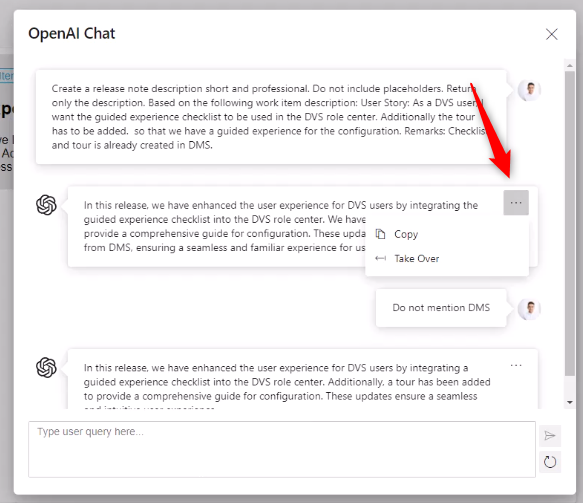
To use your configured OpenAI configuration, navigate to Work Items and then to Release Notes. In the HTML editor for the release notes, you will now find a Chat action button in the ribbon bar. This action opens a chat panel. In this panel you will also find the commands to execute your configured commands. The OpenAI will process the command and give you an answer.
If you don't like the answer, you can use the text box in the chat window to add further instructions to the release note description. Send a composed message in the text box using the right action with the send icon.
To clear the chat history and execute new commands, there is a Clear Chat History action on the right side below the Send action.
Once the AI has finished replying, an optional action will appear in the AI's chat. In this menu, you have the option to copy the text or to transfer it directly to the release note description using the "Take Over" function.